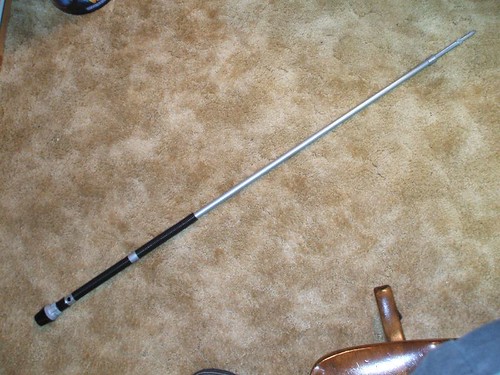
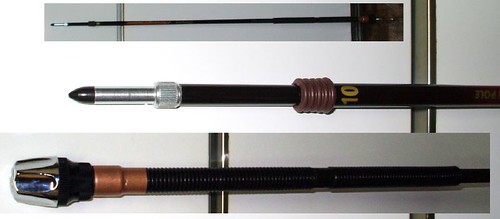
1. Fishing Pole (Pike Shaft)
I originally picked up a large 15’ Apache pole at Academy Sports like Lucious Talvionne did, but after I got home and started fooling around with it, I decided I could better achieve the look I wanted with a smaller pole. So I picked up a 10’ Shakespeare Durango Panfish Pole at Walmart. It only has 3 sections…and is narrower in diameter….about ¾”. I used the large bottom section, and cut down the middle section so it only sticks out about 3 inches.
The first thing you need to do to the pole is remove the metal brackets that would hold the fishing line. These are glued on, wrapped with a string-like cording, and then sealed with a plastic coating. My first instinct was to grab some vice grips and rip them off, after scoring around the edges. BAD IDEA. This just snapped off a bracket. What you do is get a sharp knife or other pointy blade and slide the blade along the sides of the bracket with the blade pointing outwards (like trying to cut a knot from underneath). What you are trying to do is cut the strings that bind it to the pole. Once they are cut the brackets will practically fall off and leave you with a relatively smooth pole underneath. J You will still need to do some sanding and smoothing, but it will be relatively clean.
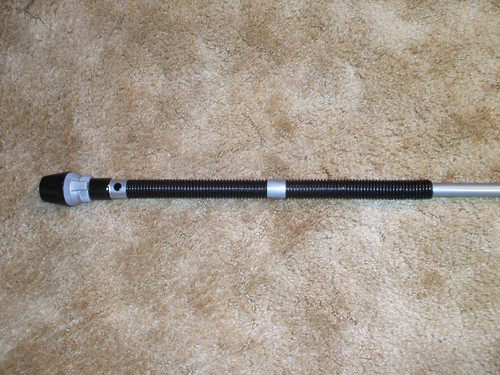
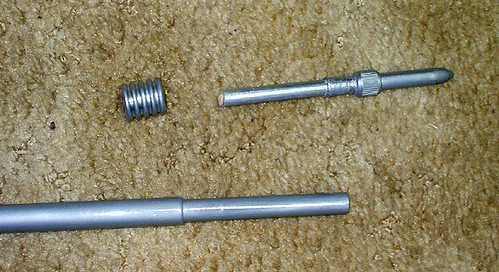
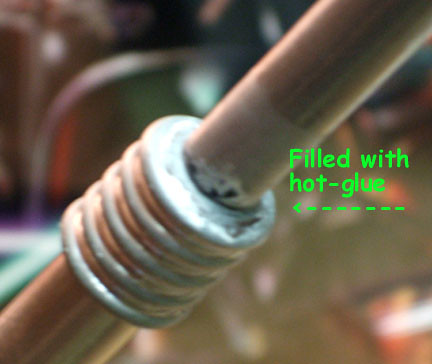
2. Multiflex Riser (Pike Discharge Coils)
The multiflex riser will be cut down to size and used as the discharge vanes (where the rasp is on some pikes). It’s just the right size that you can force it down over the seam between the bottom pole section and the tip section. The plastic is soft and can be cut with a sharp kitchen knife. I cut mine down to 5 rings, because I thought that looked best in proportion to the piece I’m using for the pike tip. Anywhere from 3-5 rings would probably work. I also sanded it lightly using a soft fingernail file to remove the seams. You could paint this part before attaching, or after. I ended up using a hot glue gun to fill I the gap at the top once it was attached…which required a repaint anyway.
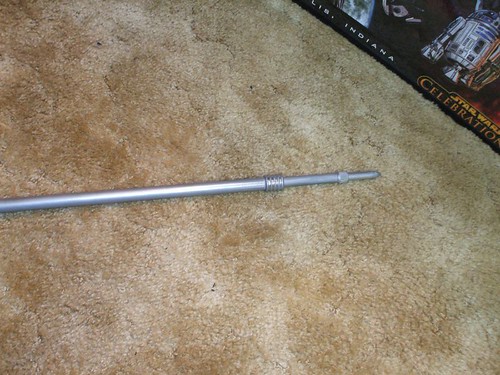
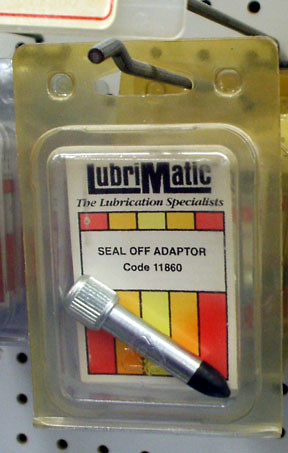
3. Lubrimatic Seal Off Adapter (Pike Tip)
This is a nozzle piece used with Grease Guns. It’s 3/8” in diameter, has a tapered rubber tip, and at it’s larger base it has a grooved ring. I just sanded down a piece of 3/8” wooden dowel a little bit and screwed the adapter onto the dowel by hand. You could also screw the tip onto a metal rod that’s compatible, or a 3/8” bolt with the head cut off, but I couldn’t find any with the same grooves. Once you have the tip attached to something…you will slide the whole thing into the tip of your fishing pole (that you have cut down to the length you want) and glue it in place last after all other parts are painted and in place. I also wrapped a little duct tape around the dowel to give it a snug fit inside the pole.
Now, I have had some trouble with the rubber tip on this piece…mainly with paint not drying on it completely. I’ve sanded it to rough it up…but by the time I painted and clear-coated…something wouldn’t dry. You might try some bumper paint that might dry. Or you could remove the rubber tip and attach a piece of dowel sanded to the right shape. Or…you could skip the Grease Gun part altogether…use some dowel for the entire tip…and find something else for the ring near the tip...like an O-Ring or a plastic ½” Delrin Sleeve (costs $0.28, found in the small plumbing parts section).
CIDHHHHH=HHHHH==============================###==+==
4. Review.
Okay, so you’ve got your pole smooth and the second section is cut to size. You’ve cut the Multiflex Riser to the size you want and slid it down over the seam between the two pole sections. And…you’ve fashioned a tip out of a dowel, the grease gun part, and or other pieces. Now, it’s time for the pommel.
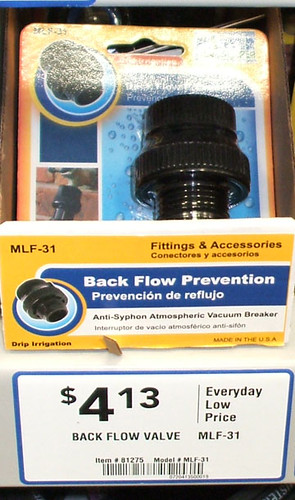
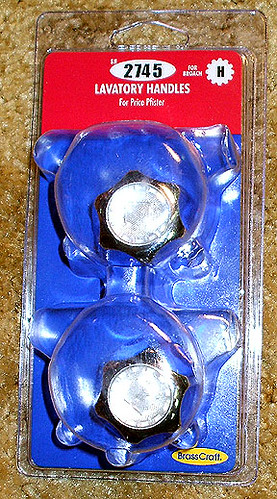
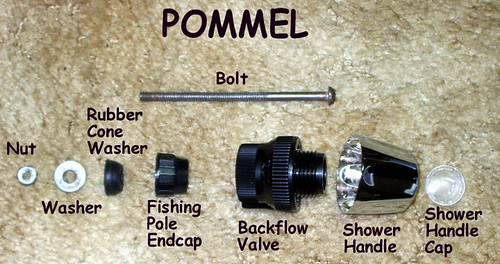
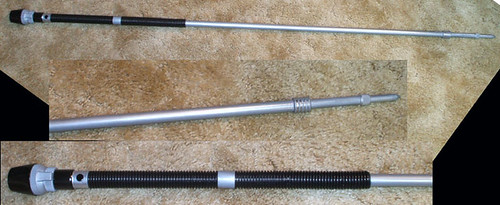
5. Brass Craft Lavatory Handles & Master Landscaper Backflow Prevention Valve MLF-31 (Pommel)
Okay, I used Brass Craft Lavatory Handles 2745 $8.99, purchased at True Value Hardware. Various other handles will work, but I liked these and they matched up to the (non-canon) illustration in the New Essential Guide to Weapons. They also fit perfectly with the next piece…the Master Landscaper Backflow Prevention Valve MLF-31 $4.13 (Found at Lowes with the sprinkler/irrigation hoses & parts near the pvc pipe.) Your pommel will consist of 5 main parts…4 of which can be seen from the outside…plus a connecting bolt and some washers.
From bottom to top…it will look like this:
1.Shower Handle Cap (the plastic cover that says C or H for temperature)
2.Shower Handle (already has a hole in the center where the bolt will go through
3.Backflow Valve (you will need to drill a hole through the center…takes about 10 seconds)
4.Bottom screw-on cap to the fishing pole (with a hole in the center…either drilled or manufactured)
5.Nut, washers, possibly a rubber cone shaped washer (like used in hoses, etc).
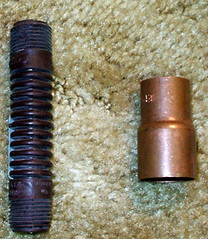
6.1’ X ¾” Copper Reducer
What you see from the outside is:
1. Cap
2. Handle
3. Backflow Valve
4. Copper Reducer
Okay, the pommel is really simple to put together…but hard to explain. All you really need to do is drill a hole in the center of the Backflow Valve, and then somehow make a hole in the center of the Fishing Pole Cap. The endcap to my pole screwed off of the pole, and was made of two parts. The outer ring that screwed on…and a centerpiece that could just be popped out. I popped it out,..and had my hole. However, I needed some support for my bolt so it wouldn’t wobble…so I stuck a cone-shaped washer (like used in hoses) to fill it in a little. You could also just drill a hole in the center part of the cap, but I thought this would work better for me. So…once you’ve got your holes…you run a long bolt through the Handle, Backflow Valve, and Pole Endcap (and cone washer). Then you add a couple metal washers and a nut, and you’re done. After all the parts have been painted, you might want to glue or epoxy the nut in place to keep it tight. Then you will just screw the fishing pole cap (with the rest of the pommel attached to it) onto the bottom of the pole. The Copper Reducer will slide down over the top of the pole and will slide perfectly over the endcap, hiding it. After it is painted…the Copper Reducer will also be glued in place. The Shower Handle Cap will be snapped in place last.
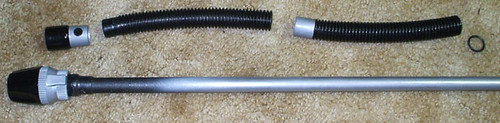
6. ¾” Black Corrugated Bilge Pump Hose (Grips)
I decided I liked a ¾” Black Corrugated Bilge Pump Hose ($2.30) I found at True Value for my grips. It’s corrugated and looks like the automotive wire covers some people have suggested…only it has no slit or seam running down it. It comes in one foot lengths, with 3/4 “ smooth sections at either end. The hose can be stretched out a little to make the corrugations bigger. You will need two sections.
I cut both of them to about 7 inches in length (and I counted out the numbers of corrugated rings to make sure they were identical lengths). Obviously, you cut off one smooth end and some rings when you do this. I left the smooth piece on the other end of the hoses. For the bottom grip…this smooth piece slides perfectly into the ¾” Copper Reducer…and will be glued in place later. For the top grip…you will slide a shortened straight section into a dividing ring.
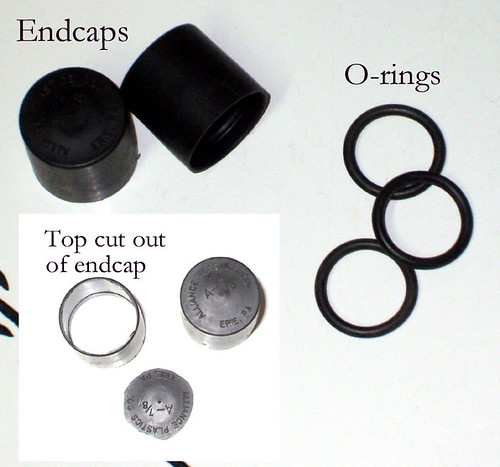
For the dividing piece, I found a 7/8” Black Plastic endcap (Alliance Plastics A-7/8 Erie, PA). My neighbor had it I his shop, but one could probably be tracked down easily. It’s about 1” long (or tall). I hollowed out the cap, so all I had left was the 1” sides, and painted it silver. I slid the dividing piece onto the smooth section of the top grip…and then slid this down on the pole. When both grips are glued in place…a small rubber o-ring (say ½”) can be slid down to the top of the upper grip to give it a clean, smooth look, hiding the edge that you cut. I also slid small paper wedge into the top of the upper grip to hold it in place…since the pole is smaller up there and had a little room to wobble.
7. Button
The final piece, attached after painting, but before a clear coat (if you use one), is an activator button. For this, I got a thumbtack…the flat kind. The kind with a colored plastic cap on it. I just popped off a black thumb-tack cap and Gooped it in place. The Goop holds it great. I then clear-coated over it for an additional seal (don’t over-clear-coat it though…or it will look foggy).
And that’s it. The rest is all painting and attaching everything permanently. I sanded all parts lightly. The only pieces not painted are the Black Corrugated Bilge hoses and of course the thumb tack button. I found that using Goop works great for gluing stuff in place, but is a nightmare on paint. I had to repaint various parts numerous times because I got goop on them. I might recommend priming everything first …but waiting to paint the silver pike parts last…after the gluing is done. I actually used super-glue to keep the grips in place…since they fit so snug…if I used goop it would have gotten all over the exterior of the handles…ruining them.
My paint scheme is as follows:
Shower Handle Cap : chrome
Shower Handle: gloss black
Backflow Valve: chrome (I sanded/shaved off the raised lettering on the valve)
Copper Reducer bottom half (1”): gloss black
Copper Reducer top half (3/4”): chrome
Grip Spacer (plastic endcap): chrome
Rest of the Pole, Rings, and tip: chrome
I clear coated everything except for the grips. You may prefer to skip the clear coat for a shinier look, but I liked the glossy effect, and the protection it provides the paint layers.

")